
Running services in containers
Package based management is now getting replaced with image based management provided by containers which is helping in solving the availability, management and scalability aspect of deployment systems. Since the operations are atomic, there is minimal interruption of service and full rollback is possible.
Benefits of using containerized deployment
- OS independent: Ability to run on any platform, regardless of the physical host OS.
- Scale up/down easily on need: One just needs to start/stop docker containers on nodes and they can be added/removed as compute nodes to openstack.
- Atomic operations: Installing, patching or upgrading operations are atomic, either they will successfully complete or will fail. In case of failure, they can be removed and the system is back to its old state.
- Fast deployment: Deployment of openstack takes on an average about 10 minutes. This is much faster than any other deployment tool: puppet or salt.
- In-place updates: Instead of rolling-updates, one can follow the pattern on in-place updates. Whenever a new image is available, one can simply stop the old-container and start a new container with the latest image. In case of any error, one can fall back to the old image. Thus, this model provides a better service manageability and update process.
- Ease of use in adding/removing services: Since everything is containerized, adding/removing services is now like starting/stopping the containers.
- Self-healing deployment: Services can be managed by kubernetes or docker-swarm and failed containers can be automatically restarted. This results in a self-healing deployment.
- Immutable and portable: Images once built don’t change over time. Hence, you can recreate the same setup on different days/different environments with exact same piece of code running. Also, since everything is containerized, it can be moved from one place to another with ease.
These atomic operations, ease of management and scalability, ability to run anywhere has resulted in almost all the technology giants to shift their focus to container based architecture. Openstack has 2-3 sub-projects focusing on containerized deployment. One of such project is Kolla.
Introduction to kolla
Kolla is an opensource openstack project aimed at providing production-ready containers for openstack deployment and management. The project aims at utilizing the power of latest container technologies in deployment and maintenance of cloud infrastructure.
Sample Design for multimode deployment
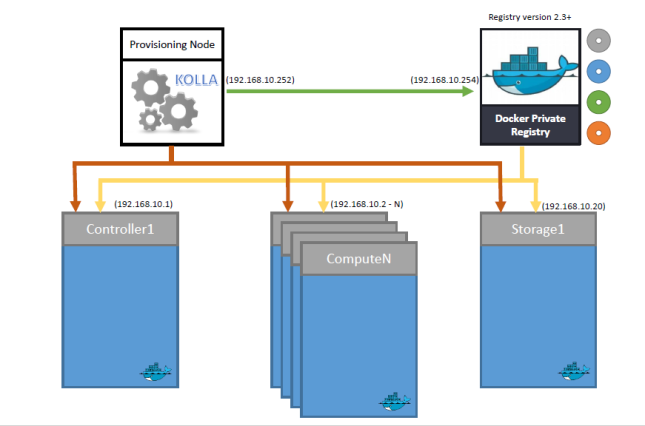
- Provisioning Node
This node is responsible for building images. Source code is downloaded on this node, images are built from the dockerfiles, tagged and then pushed to the registry. This node should have passwordless root access to all the nodes which are to be configured under openstack so that it can run ansible scripts on those nodes.
- Registry
This represents a private-registry which is running on port 4000 and it holds images which will be deployed on the openstack cluster. This works as a central store from where every node will download the image and is the source of truth. In production, one should run the registry over HTTPS.
- Controller Nodes
This node runs openstack-services except the nova-compute services. Most of the deployment designs follow running all the services (glance, horizon, cinder, neutron-server, etc) on the controller node itself, however one can distribute these services on separate dedicated nodes as well.
- Compute and Storage
These are the nodes where the instances will be created and storage allocated. These nodes contain nova-compute, openvswitch-agent and cinder-volume services. Other dependent services are also launched on these nodes based on the configuration model used.
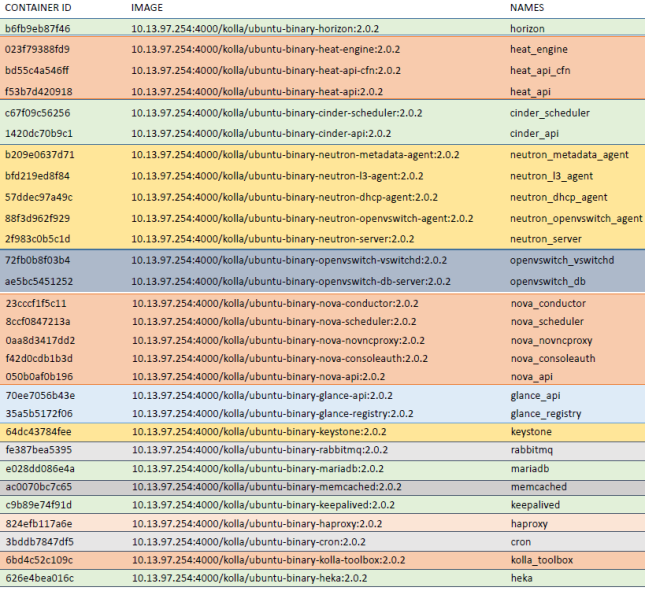
Services running on controller node
Figure below lists the services running on a controller node. Same family services are grouped together in a bunch of containers known as container set. Each container represents a leaf of the family (container set). All these different services combined together form the openstack controller. More details about the concepts of container-set and containers can be found at: https://github.com/openstack/kolla/blob/master/specs/containerize-openstack.rst
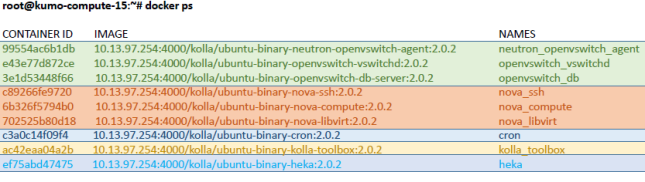
Services running on compute node
Networking
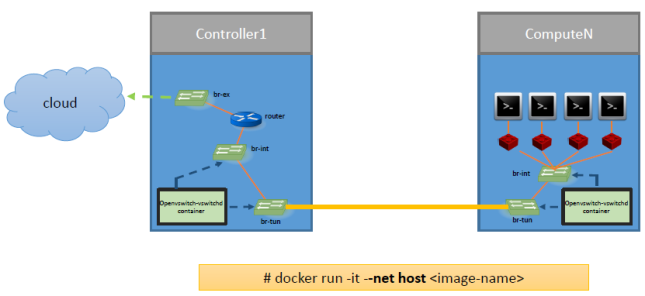
In a typical openstack deployment, neutron manages networking by creating bridges, namespaces, ports and tying them together. Kolla uses the same networking model. However, since every process is running within a container, some containers need special privileges/permissions so that bridges or namespaces created by them are seen/visible on the host’s network stack. To achieve this, docker uses “–net host” flag which basically means that the container will share the physical host’s network stack rather than having a separate network stack. Thus, bridges, ports, namespaces, veth-pairs created by the service running in that container are visible across the physical host and can be tied up to the VMs running on the hypervisor. This way, kolla is able to achieve all kinds of neutron models for routing the traffic.
Some containers are started with special privileges(–privileged=true). A privileged container is able to mount various system directories to the container. Also, it has –ipc=host, –net=host, –pid=host flags set. Thus, these containers can share the physical system’s namespaces. Key thing to note is that containers don’t use the EXPOSE functionality provided by docker as there is a penalty of 20 microseconds for every packet being sent to docker-proxy for routing.
Directory /run/netns present on controller node is mounted as a shared directory across neutron-dhcp-agent, neutron-l3-agent, neutron-metadata-agent and neutron-lbaas-agent. More details on how different neutron services are started in a container can be found at: https://github.com/openstack/kolla/blob/master/ansible/roles/neutron/tasks/start.yml
Configuration required for multinode deployment
Similar to singlenode deployment, everything is same except that one needs to specify the nodes being used as different services in kolla/ansible/inventory/multinode file. Here is the link to blog posts giving proper steps:
http://docs.openstack.org/developer/kolla/multinode.html
Sample configuration output from kolla/ansible/inventory/multinode file:
Deploying Kolla for multinode deployment with single interface on controller:
In case you have a single interface on your controller node and still want to deploy kolla, you can use these steps to create a virtual interface. Use this virtual interface as second eth when specifying configuration in globals.yaml file (here, the eth name would be veth1). Don’t configure any additional ip-address to this veth1. Kolla will automatically configure this interface when ansible scripts are executed.
